Showing posts with label Anna Maria Horner. Show all posts

Wednesday, 27 April 2016

Posy Pinwheel Quilt


I only really paid attention to this tree for the first time today, and I can't believe I haven't noticed it before. I loved it so much that when I came home to look through my photos after our little shoot this afternoon, I didn't have any close-ups of this quilt. I just kept wanting to fit more of the tree in. Isn't she beautiful?

In fact even as I sit here to write, I'm drawn to say more about our incredible country side. Perhaps because after a week of being inside with a house full of colds, it was just so good to be out in the sun and the warm Autumn air. So good. To frame a finished quilt and a beautiful old tree in a photograph, to focus in, to make the parts align, to remember again I have so much to be thankful for... this did more for my poor old head than Panadol and Vicks have all week.  


My Posy Pinwheels had been sitting, quilted and waiting for a big tidy up on my cutting table so I could trim the wadding and back, and bind it. Set aside first for my Flock of Stars quilt, and then for two more quilts for Free Spirit's Quilt Market Booth, I was finally this week able to give her (and my messy studio) my attention again.
I English Paper Pieced this quilt from 2" jewels and 1" hexagons. I love these sized shapes because they easily fit along a 2.5" strip of fabric. So I went through my Loominous scraps from my Fair Isla quilt, cutting off a strip of each print and basting them into petals. I think it would also make a nice quilt to use up a jelly roll.
EPP is very close up, very intimate, very, very slow. So it was a completely different experience, a little like seeing the world from a plane, or up a tree, or like going outside when you've spent the week in, to take photos today and feel the movement I was hoping for. And I was kind of thinking it would feel like a birthday party or country fair, but today with all that long grass and prickles and darting insects, it felt a whole lot more like an ecosystem. It felt like fresh air and wildflowers and swooping birds. 
They say laughter is the best medicine. But I would have to argue for colour.


Friday, 25 March 2016

Pinwheel Posy - In Progress


Hmmmm. A tidy house deserves some hand stitching, wouldn't you agree? It's a rare treat to be able to take such a wide snap of our home. In this picture you can see the bunting I made for my old shop in the main street of Newcastle years ago, the baby rocker I made with Tully before Finlay was born (she now uses it as her little sofa), and the old green cupboard made by my great grandfather that homes our craft and homeschooly things. And can you see that chest poking out on the right of the green sofa? That came came over on the boat from England with Tim's mum. And here, laying claim of the dining room table, is my Pinwheel Posy quilt, slowly coming together, one hexie at a time. I do love our home.


Every so often I need a quilt that just follows a simple idea. Use an entire fabric line, let someone else choose the colours, stitch according to one simple rule. Over and over. It's a lovely, meditative thing, to have a quilt that doesn't need thought. It's also wonderful to have one that challenges and excites, but those quilts aren't for meetings, or sitting through swimming lessons, or sipping wine with a movie on the weekends. And they're not for taking over the dining room table and being available to the myriad of wonderful interruptions on a Good Friday afternoon.


I cut a 2.5" strip of each print, making it the perfect jelly roll quilt, and cut the 'jewels' as you can see below, with little waste. I love using Loominous, a woven collection, because it's basically reversible, so I can flip petals to keep stripes heading in the same direction. I've used jewels that have 2" long side, and a 1" short side, with 1" hexies.


I've been experimenting with sewing the quilt together in rows already constructed, or adding the flowers piece by piece. Mostly I like the former, because once a row is made, it's joined to the quilt with one long, uninterrupted thread, and it's easy to come back to when those inevitable interruptions arise.
And each time I finish a row, I stand back in wonder at how I'm only one more row through! Surely it must be two or three! And then I take a deep breath and remind myself that this quilt isn't for rushing. It's for resting and waiting and praying in the sunshine.


May the spirit of grief, yet hope; contemplation, yet joy; death yet life, bring you colour and peace this Easter!

Jodi. x

Tuesday, 2 February 2016

Watermelon Summer + Skipping Stones


I had such happy mail today! My special, curated, summery little bundle of Aurifil Thread for Ms Midge, purveyor of very fine thread...


...and this beautifully brooding new collection by Anna Maria Horner, called Skipping Stones for Free Spirit. And did you notice those Filigree reprints? Swoon!

I chose these threads for watermelon and Splice icy poles. And today was the perfect day for them to arrive, the kind of warm, summer day where you enjoy stepping outside, enjoy the windows wide open, even enjoy hanging out the washing! Not too hot, and just the right amount of breeze. These are the colours of swimming pools and swimming costumes and bright beach towels. If you've already signed up for Ms. Midge's monthly Aurifil club, you'll be getting these in your happy mail box too! Otherwise, they'll be available for purchase in her shop next month.

The stormy cottons are for a new project for Free Spirit. I can't share much yet, but I couldn't help taking photos of these for you. Lovely, rich, neutral reprints of some of my favourite florals. They are far from your usual, stark, geometric low-volumes. They remind me of lace, and those silhouette brooches my grandmother wore. Warm and friendly.

Wednesday, 20 January 2016

Free Spirit Quilt Top


This is how high I got up the ladder before my fear of heights set in!

I've spent the last two weeks working as hard and fast as I can to get this quilt top done in a timely manner for Free Spirit. All that's left is to applique a big white logo across the top and quilt it, and then ship it off to Charlotte, to Free Spirit HQ, so that they can take it to Quilt Con West next month!


So I thought today you might be interested in hearing a little about my work with Free Spirit?

In about September last year, I was approached by Free Spirit's marketing department in an email saying that Anna Maria Horner had recommended me as someone who might be interested in mapping some virtual quilts for her upcoming lines. The email was such a surprise, as I'm sure you can imagine, that I had to read it three times to see if I'd understood it correctly. And I didn't understand it. What was mapping? And what were virtual quilts? Anna Maria Horner knew who I was? And if I wrote back with these questions, was I giving myself away that I was completely in the dark, and therefore, possibly the wrong person for the job?

I took the plunge, politely, but excitedly replying that I was very interested, if they could just let me know exactly what I was interested in.
It turns out 'mapping' is designing, using the pictures of the fabric designs. I would design a quilt (actually, three or four quilts) on my computer with the images of the fabric line and submit them for consideration. They would get back to me with their favourite, and I would write a pattern for them.


I really enjoy the work. And if I may say so, I think I'm good at it. Though, that's not to say I haven't had to learn a lot. It's a very different process writing a pattern for a quilt before you've made it. My usual quilting process involves a lot of trial and error at the best and quickest way to put together blocks or quilt tops. I can't go through that process here. Often I tend towards scrappy quilts that play with value, rather than two-colour blocks, which makes cutting instructions really tricky. And I don't think I have ever, ever, sat down and thought about how much of each print I need and what exactly I need to cut before diving into a quilt. I usually just start cutting until I feel like I have enough, which is usually only about half of what I need. I sew it together and then start cutting again. And I guess, most importantly, while I'm making the quilt, I often make changes, because of how I feel about it now that I'm working with it, or because I've built on my original plan.

But quilt design on a computer is a completely different animal, and it's one I've learned to really love. I've had to learn that even in a scrappy quilt, I should use a similar amount of cuts per print, making the pattern much easier to read, and to write. I've learned, as I come up with new blocks or layouts, to ask myself "Could I actually describe that to someone? How?" and, "Do I even know how I would put that together?" It's easy to get creative with lines on a computer. It's a whole other thing to sew fabric together in the same way. The whole process has felt like learning a new science, or a new language. It's like the grammar here is different to the way I'm used to speaking, but I can find other ways to get my message across.

I've been amazed to see old designs I discarded on a previous job, suddenly come to life with a completely different line of fabrics. It's helped hone a sense of what brings different fabrics out, what do different styles need to look beautiful.

The lovely folks at Free Spirit have been so kind and open to me learning these things, happy to answer my questions, and I am very grateful for the opportunity. I've worked with lines that are exactly my taste, and I have more ideas than I can use. And I've worked with lines that are so different to what's in my stash, but the challenge of making something I'm really happy with has been so satisfying. I wish I could show them all here now! But I'll wait until the quilts have been shown at Quilt Market.


And then, about six weeks ago, I was asked to design this quilt, a special request for the Free Spirit Booth at Quilt Con West in Pasadena next month. Actually, again, I designed three quilts. I mapped the cityscape at the top of the post, the medallion quilt above, and the one I'm making. My brief included using a colour gradient, from purple to aqua, and the Free Spirit Logo in white. I really, really love the other two quilts, but I'm so glad they chose this one. It does make me feel like a Free Spirit. And it's also the simplest design, a good thing for me because I'm making it on the other side of the world.

Still, it's taken about twice as long as I anticipated to sew it up. I've always been terrible at guessing such things, and my optimism got the better of me here too.  I've been so fortunate that Tim is at home these days, able to look after the kids and the food and our other needs. Working from home is a challenge! But it still feels like a gift that I can tell my kids, who have walked right past Tim in the kitchen to come ask me for a sandwich, that that's Daddy's job this week. Oh, and to have my very own coffee connoisseur in the next room!


And my very own Quilt Critic. Here he is telling me what I didn't quite achieve in the design. We've been married ten years next month, and I'm glad I've learned to appreciate his feedback, and then still hold it up confidently against my own! And I love this quilt. I really love it. I can't wait to start the next challenge of appliqueing the logo. I can't wait to use some very new, yet to be released, wideback cotton for the backing! And I can't wait to see it hanging in the Free Spirit booth at QuiltCon.

Will you be there? Will you take a photo for me?

Monday, 11 January 2016

New Day, New Year.

Today is the first day.

Tim's at the dining table reading about earthquakes with the kids. And I have escaped to my air conditioned cave to sew and write a blog post.
When we were at university, Tim and I used to joke about how his degree (in engineering) would get him a job, and mine (in history and Russian) was great for dinner parties. But when suddenly, a little over a year ago, the north wind blew, and two souls, feeling dry and a little lonely in suburbia, got a call about a house in the country, it didn't take much, if any, convincing for us to pack up our house and move to the land of the deep breath.


We've been living in Canowindra, NSW for 13 months and it's golden hills and deep silence (except for this time of year, when the cicadas are celebrating their yearly riot) have affected us deeply. Here there is no academia, no race, no big shopping malls or beeping horns. I have enjoyed a year off comparing myself to that model on that billboard, or that family in that big house. There is hard work, there is a connection with the seasons, there's an optimism, and a kind of submission to the whims of the weather. If you've read the Little House books, you'll know what I mean. "Surely this year, it will rain. Surely this year, our hard work will pay off."

I like living here with these people, and these hills. Every so often there'll be a remark about having to go back to 'real life'. But I wonder if we've stumbled upon it here, where we know our neighbours and work with our hands.
This time last year I changed my blog name to reflect these other changes. Tales of Cloth became what I was hoping for, a place of stories and connection, of colour and learning. I didn't have as much time for it as my dreams needed to be fully realised. But I had time to sew and to read. When Red Sky at Night came to a close, my year did too. And suddenly my mind was blank. I had nothing to write about. So I let it sleep for a while.


Sometime during the second half of last year, I was approached by Free Spirit to design some quilts for Anna Maria Horner's upcoming lines. Yes! I made up some 'virtual quilts' and submitted them. They liked my work, and asked me to design with some other lines. And then that work led to more, until finally, last month, I was asked to make a huge quilt inspired by the Free Spirit Logo for QuiltCon 2016! Having spent the whole year in the history books, and working a lot with red and white, working in this way has felt like an absolute gift. It's interesting and challenging and fast. And I'm soaking up every bit of it.

One of my submissions for the QuiltCon 2016 quilts that wasn't chosen.

Around the same time, Tim and I started to reflect on this new 'real' life we'd stumbled upon. His Masters was drawing to a close (though even now drags on beligerantly), and our work here with Cornerstone was rich and fullfilling, but low student numbers were taking its toll on the community finances. Surely there was some way we could make the most of my connections with the quilting community, that could provide some unskilled labour for the young adults who stay here with us, work to pay their way, and study the Bible. We think we've come up a corker of an idea. But I won't share it now. All that just to say that we've caught that kind of farmer's optimism, "The harder I work, the luckier I get", and like ducks, we're paddling away behind the scenes to bring something new and colourful to the quilting community.

And that's why I am here! And Tim is out there learning about earthquakes. It's why, when I finish writing, I'll start sewing, instead of cutting up apple. 2016 will be a year of working together, of trying new things, of argueing, I'm sure, whose turn it is to do bath time or cook dinner. But nothing new is ever smooth, and I feel hopeful for a year of working at something that is meaningful and interesting to both of us.


Saturday, 31 October 2015

The Orphanage Quilt


If old WIPs make a satisfying finish, imagine all the good feelings brought on by finishing six at once! This quilt has been on my mind for along time, back when I asked my Do Good Stitches bee back in February to send me some scrappy improvised blocks. And then as they arrived, I added them to my orphan block pile, wondering when I was finally going to take the plunge and sew this thing together. To say it made me nervous was an understatement. This is not usually how I quilt. It's not a pile of squares sitting next to the machine and sewn together at random and it's not carefully laid out blocks that need concentration and working out. It sits somewhere in the middle, not in a happy medium kind of way, but in a road-less-travelled, throw-the-rule-book kind of way.


My orphan block box is a scraggly mix of leftovers from finished projects and abandoned quilts that started with a bright future but quickly resulted in disillusionment. It is a place of discomfort and guilt, bereft of inspiration.What else do you do with leftover blocks? It's times like this I realise that in my quilting life, more than anywhere else, I am a hoarder.

And it's a good thing I am, don't you think? I used only about half of my leftovers, but with the ones that made their way back to the box, I now feel a sense of peace and purpose. One day I'll do this again. Maybe it can be a yearly ritual. Like a jubilee. Setting those old expectations and dreams and "I don't know what to do with this so you can go here" into a quilt to start afresh with new projects and a little less guilt.


As I was showing my progress on Instagram, a few folks asked me to explain my progress, so I took lots of photos to give you an idea here. Like I said, there's no rules in improvisation. I went mostly by feel.

There's no way I could have achieved this without my design wall. I laid out the blocks, keeping in mind that I want to sew them together without going around corners. So I made them into bigger blocks of 2-4 pieces. Coincidentally, most of these were divisible by 3. That means they were 3", 6", 9", 12", etc, so a little mindful arranging made them fit together easily. When they didn't, I had strips and strips of leftover half-rectangle triangles from my Tent City quilt that I added to anything that was too small, and then trimmed back down if I needed to without worrying about keeping my points intact.

I sewed those bigger blocks into 3 large slabs and was almost going to sew those together when I realised I was out of wadding. This actually felt a lot like providence because I did have long, wide strips of wadding, leftover from other quilts mostly the perfect size for my slabs. The one that was too narrow, I sewed to another and pressed the seams open so it would fit.


I used a Quilt-as-you-go method I first came across on Maureen's blog, which I had only ever used with smaller blocks. I spray basted the quilt top slab to one side of the wadding and then quilted lightly over the two layers. Then I trimmed all the way around the excess wadding. And then I did the same with the other two slabs.


I trimmed the whole quilt a little again, just where there was uneven edges. Then using a 1/4" and my walking foot, I sewed the quilted slabs right sides together. I lay out my backing fabric and taped it to the floor so it would stay taut, sprayed and laid out the quilted top.


I then went back to my machine and first quilted either side of the thick seams to hold them down. Then I used a straight, meandering stitch, basically zig-zagging my way around the quilt. I wanted to try something different and more improvised than straight line quilting, but now that I'm done, I wish I'd stuck with my favourite! I used a mix of hand-quilting, thick variegated Aurifil thread, and my go-to white. It was a fun experiment, trying to keep with the improv theme, but I think simple, horizontal lines would have held it together more.


Undoubtedly, the very best part of quilt-as-you-go is when you suddenly remember that you can use you backing as your binding! I simply trimmed around the backing 1" from the quilt top edge. I then folded it in half towards the quilt, then over the edge of the quilt again, and top stitched. When I came to a corner, I folded the overhanging pieces to the left to make a little triangle. The I folded the same method, folding the fabric in half and then over again to make a neat mitered corner.


I'm not sure if I would usually use a binding this dark, I generally pick out a colour somewhere in the middle, but I love how this all hangs together. In a quilt with a lot more low volume than I usually try in scrappy quilts, I think it makes the darker tones shout out happily.


There is much joy in this quilt, in the trying something new, using something old, freeing myself of quilts hanging over my head, some for years. Some were hard to let go, like my Penny Sampler. I would love to make that quilt again someday! But for now, the colours stumped me, I was never sure about them. Other blocks were a relief to use, like the Ohio Stars and the leaves. The leaves were generously made for me by an old bee and the colours just didn't go together like I hoped. Oh, it's good to see how much I've learned about colour over the last five years! I also love the contrast and interest the lovely flowers add, but I was sad when they arrived late, lost in transit for weeks before getting here. I'm glad they finally have a home!


All in all, this quilt was made by about 20 people from about 15 old quilts! Because half were for do. Good Stitches, it'll be heading to a charity next. A quilt of previously hope-less blocks for someone struggling for hope. Gosh I love long-coming finishes! I love new starts, renewed confidence, and stories with happy endings.

Wednesday, 14 October 2015

Cathedral Windows - a tutorial


A few months ago, I embarked on a Cathedral windows quilt, and then quickly 'came to my senses' and popped it in the WIP box. Why on earth does someone make a Cathedral windows quilt? It's not like your usual sandwhich of top-wadding-backing. My 'learning as I go' sewing was pretty rough and tumble. And I didn't know if I wanted to go so far as to make a quilt for a bed, but I didn't really want a wall hanging, and we don't really need another lap quilt in the house. I never realised the need to sew with a clear end in mind was so strong in me!

Then earlier this month, I made the decision to dedicate October (#WIPtober on Instagram) to my WIP box. It was full to overflowing with abandoned projects that had been set aside for clearer goals and quilts with deadlines. But for October, I would try to set aside that need for a purpose, and sew just because. I would withhold from starting new quilts, and I would find ways to be re-inspired by the old ones.

So even though it goes completely against the grain, and I feel like I've launched off the runway with nothing in mind except to enjoy the view, I brought out this sweet little project and started to sew. And you what? When I'm really good at beating back that 'Why are we doing this?' voice, I really enjoy fabric origami! These come together in a way so that with each new row added, you have a complete 'quilt'. A change in the process is as good as a holiday, and there's something a little exciting about knowing that when I've had enough of sewing together folded squares of fabric, I'll be done!

There are quite a few Cathedral Windows tutorials in the ether, but I thought I'd add mine to the crowd, because I tried a few different methods and have settled on a mix of them. I'll share my reasons as I go.


Most tutorials start off with a large square, and I cut mine 11". It's too late for me now, but can I recommend 10.5"? That way you can cut off a strip from your yardage or fat quarter, and fit four or two neatly cut from the strip. I've got scraps enough for another quilt!

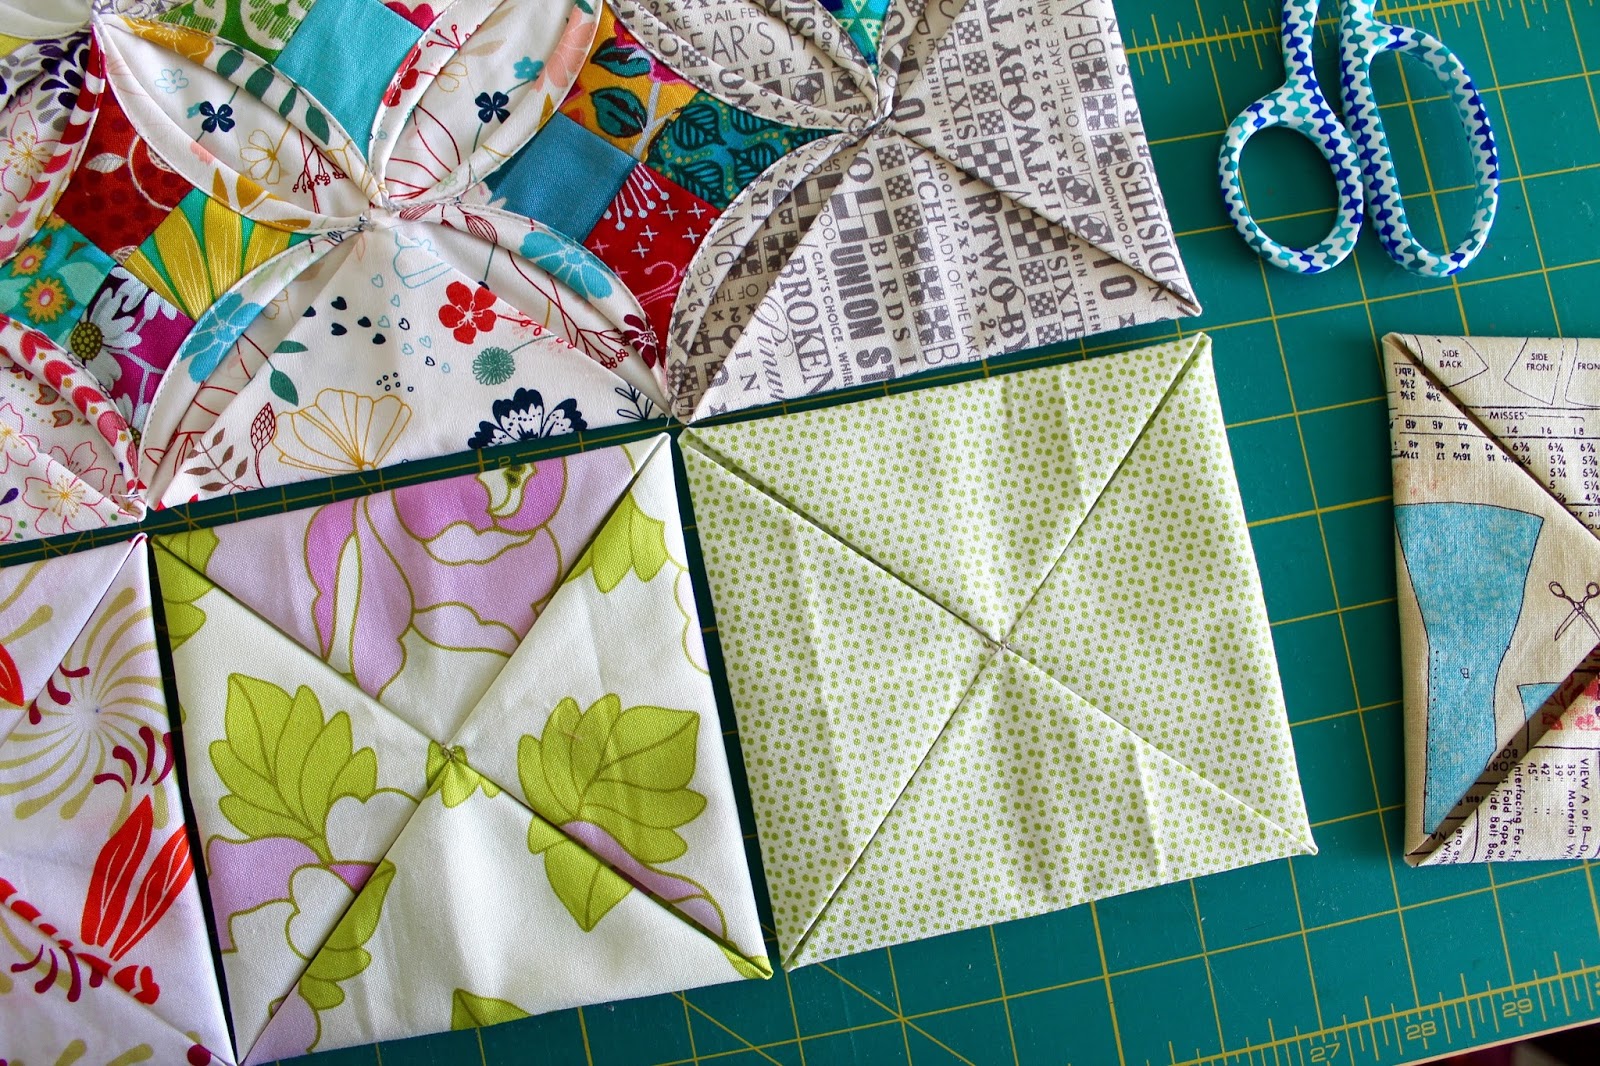
Most tutorials also ask you to cut a slightly smaller template from cardboard to iron the edge over, but I just knew if I had to stand at my iron working with a template, that this project wouldn't last long. After lots of scouring, I found a tutorial that folded the square like I do below. It uses more fabric (which I why I went 'scrappy' rather than use one print) but I like that this adds weight to the quilt. This can be a great way to use up those hard-to-use, big-print fabrics.

  • First fold your square in half and sew along the shorter edges.
  • Pull down the top edge and pin the two seams together.
  •  Sew along this new join, leaving a hole at the end for turning it inside out.
  • Use a pin to pull out the corners and press flat with a steamy iron. The little hole can be left as is.
  • Now fold the corners into the centre and press.
  • Hand stitch the points down. I just nicked the lower layer of fabric with my needle, rather than go all the way through. 
Many other tutorials have you sewing you squares together before this point to keep the seam invisible, but I found it really hard to keep it all flat that way. Hand-stitching the centres down first and then sewing them together has given me a more consistent size and finish. It's also less awkward, less wrestling, putting it through my machine. I really don't enjoy fabric wrestling!

NOTE: If you want different prints in the 'petals', they need to be added in under these folds, before you stitch the corners down. (measure yours first, but 5" fit in mine) I tried it, but abandoned it. It's really hard to cover over the raw corner edge, and it stressed me out. 

  • Set your machine to Zigzag, around 5mm (1/4") wide and 1.5mm long. Sitting two folded squares up next to each other, zigzag down the middle to hold them together.


I'd already made a batch of nine at this point, so I stitched together another row of three and then added those to the large block with the same zigzag method.


Next, I grabbed the long-held scraps of another project I finished over a year ago. Oh, I love combining old WIPs, don't you? I cut up these squares made of rectangles, sewed them back together and trimmed them to 3".

  • Sit your square over the seam between two folded fabric squares. Grab a fold along the side of the 3" square and fold it over the edge. It should curve naturally.
  • Top stitch around that curve. This worked best for me with my walking foot.
  • Stop at the next corner with your needle down, turn your work around, fold the next edge over, and sew again. Sew all around the 'window.'

  • When you get around to where you began, if you can easily move to another square, keep the needle down, and grab your next piece. You'll have less threads, and a tidier back, if you can stitch these down in runs of four.

I've been working on this for about a week now. Some cutting, some folding and chain stitching in long sessions, some turning inside out in the evenings, or during school time. It's a nice project for having a few different steps you can swap between, depending on your mood. I do like a quilt that can fit my mood. Perhaps that's a good purpose for this one. To be fun and pretty and whatever I feel like at the time.
I'm always impressed by how much I learn, how much I'm forced to rethink things, to engage my creativity, when I give myself time for my old, abandoned projects. Maybe I should make #WIPtober an annual discipline?