Friday, 31 May 2013

Apple Leaf Block {a template and tutorial}


In our new spare room/office (a result of our latest re-arrange), there hangs a couple of oversized 'baffles'. They're sound-deadening thingamies that Tim uses when he's recording music, that we've decorated so they don't look so out of place. We stapled some Ikea fabric to one and I pinned these beautiful apples, a mixed-media artwork by my very talented friend, to the other. 
Below the baffles lies the very bed I slept in when I was Tully's age. And on the bed lies a simple wool blanket.


June is my month for the Scrappy? Sew Bee it! virtual quilting bee and I'm asking my bee buddies to make me a quilt inspired by these apples to go on this bed. Thank you!
I asked Tim, who is as technical and design savvy as he is musical, (a great catch, really), to do up this Apple Leaf Block template as a PDF for you so you can make up this block for me (if you're in my bee) or for yourself (if you're not!). You can access the PDF file here.


Print the file, making sure your printer is set to no Auto rotate and centre, or scaling, or any other such thing. I've included a 1" square for checking it's to scale. You'll only need to cut out the leaf. The surrounding 6.5" square is just to show you how it eventually sits in the block, but you can use it as a template too, if you don't have a rotary cutter and mat.


So really what I've made here is an Orange Peel or Cathedral block. But though I searched, I couldn't find one where the leaves were appliqued onto little squares, and then they were sewn together. Instead, they were appliqued to the whole cloth, or 12.5" blocks, or pieced. And because my Bee just uses scraps, I thought a mix of neutrals on this scale would look much nicer. 


Cut around your leaf and affix it to your 6.5" block diagonally accross it, using your favourite adhesive method.
 *confession! While taking advantage of my sleeping toddler to get these blocks done in daylight, I realised I had run out transfer paper! So today, my favourite method was spraying 505 through my fly screen...


If you're in my Bee, I'm not fussy about your applique method. If it helps, I only ever use white thread, and my zig zag for these leaves was stitch width:2, length: 1.

Zig zag around your leaf.


For this quilt, I'd love a mix of neutrals, solids and prints, for the background, and colours from the above Apples art (Teal, green, aqua, red, ochre, and a little orange, yellow and pink)
Once you've made your applique leaf squares, there's several ways you can put them together.


You can make circles or flowers (and you can see above this is essentially the same pattern) or you can do a X and O variation.
For my quilt, I'd like them like this:


Sew your squares together (hopefully your corners match better than mine! I was racing the pre-school bell!) to make 12.5" blocks. (For my bee, you only need to make one.)

These came together SO quickly! And are such a satisfying way of eating into those scrap buckets. I can see myself making many more of these.

Enjoy! xx


Tuesday, 28 May 2013

A quilt for moving on.


It was in the aftermath of all the change and grief earlier this year, that this quilt was born. In the small, silent privacy of my new sunroom studio. When the repetition and attention and clear, quiet whites and greys, and just a touch of blue were having a tangible effect on my soul.


I had brought out my neutral bucket of scraps, (I couldn't imagine working with colour), fished around for the strips, then grabbed the leftovers from my Children at Play pinnies, and the linen ones, and the 'white on white' prints that I had used for a custom order quilt last year and never looked at again. I think it was the memory of that quilt, warm, calm, traditional, that made me feel grounded. And I wanted to create something like it again.


My first log cabins were very intentional. Each piece sewn and ironed and trimmed with care and design. And then (as I wrote here), as that lost its therapy, I started to chain piece. Then, more recently, as I started to feel more myself, I began introducing more pops of colour. More flat solids and less tone on tone. More modern prints and less care whether it matched.


I finished up all the 8" blocks and laid them out on the floor of my friends' house to ask what she thought. I had planned to make different sized blocks and have them scattered throughout. But the regularity of the squares made such a simple, pretty baby quilt.
Cath said to me, "That's pretty, but the other one you have in mind will be wonderful."
I'm so thankful now for that encouragement. It gave me the extra little push I needed to keep going when I felt like finishing up there. I felt the shift from this being all about safety (which was just right in the beginning) to realising I was in a place again where I could go beyond my natural attention span, or motivation, to create something I really wanted. And it feels good to be here again!


I'm joining in 'Festival of Strings'!

Scrap Attack {String Fever}

Monday, 27 May 2013

Stained Glass Little Folks.


So we live in a tiny 1940s workers cottage in an old coal port city. (The city is old - by Australian, not world, standards, the coal port is still active). And our house is a collection of small, enclosed boxes. Two bedrooms, a lounge room, dining room, all around 4x4 metres (yds) and a tiny sunroom, about 1.5 x 2.5m.

Our bedroom was the smallest in the house, in the darkest corner, right next to our neighbour's backyard, and their interesting choice of cigarettes. ;) And in the drama of the first few months of this year, and a moment of inspiration, I decided I wanted this season to be marked by rest, light and colour (and fresh air). And I couldn't get that in my old bedroom.

So we embarked on a (yet another, because a collection of boxes allows for change when the feeling hits) big rearrange. And we moved our bedroom into the light-filled loungeroom, our lounge into the old dining room and our dining room onto the back deck. My new sewing room now comes off our bedroom, and we put Tim's office and a guest bed in our old bedroom.


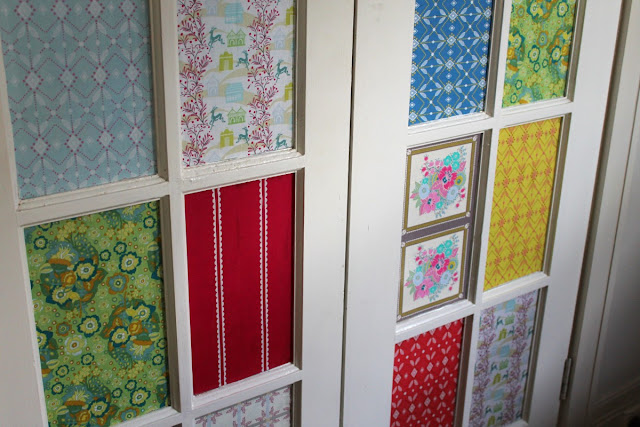
So that's our new lounge, or family, room through the glass doors from our bedroom. After wondering for a month or so, whether to make curtains or not, Tim and I had a flash of inspiration. Voile is practically 'two-sided', and glueing the fabric on would be a flat (space-saving), easy, removable solution to create privacy for our new room! So I measured the glass panels, cut this Little Folks Voile, by Anna Maria Horner, to size and started painting the windows with glue and fabric.


I chose only a few prints, in a limited colour palette, built mostly around the Diamond Mine prints. You can see the glass doors not only limited privacy, but made both rooms feel busier. The view through the doors was reflective and muddy. And if there was mess in the other room (which is often in our house!) it made both spaces feel untidy.


I used PVA (craft) glue and just lightly patted the voile over the glass. If I pushed too much, it would bunch, and was hard to rescue. The finished result has made both rooms feel smaller, yet brighter and calmer. I think I just sat and admired it for about three days!


On the other side, the kids have their little table, where they eat meals or do craft if it's too cold outside. I love that the 'back' of the fabric is still so clear, and the glass protects it from hands and food and wandering crayons. And the light from the front of the house still comes through and plays through the colour in different lines and shapes all day.


And at night, when Tim stays up longer than me (or vice versa) we get our own beautiful stained glass windows, instead of the harsh, direct light from the ceiling.
Last weekend, Tim's folks came and stayed and we all deemed the new layout a great success. We're using our huge backyard more as a big open-plan play room, we loved having a guest room instead of them sleeping on the lounge room floor, and on Sunday morning, when my introverted self needed a break from the 'crowds', I was able to hide away in my girl cave and sew for an hour and regain my sense of self. And I love to be in my large, light bedroom.
Even though this layout is untraditional, I think it's the most suited to our goals and personalities. And it's drawn our attention to what we do have rather than what our house lacks. A bit like what I was talking about here for my Fabric Fast.

I think next up is some brighter fabric art?

Saturday, 25 May 2013

Put on your Learning Hat.


It was while basting this quilt, hunched over the floor in my tiny living room, wondering whether it even enough, smooth enough, pinned enough, that I  made the decision to approach it as a learner, not a maker/seller. It was my first time making a single bed size quilt, and I wanted to free-motion quilt it, another first for me. So I set up some rules: No unpicking, no saying, "I should have known", ask the question, "what have I learned?"
I can tell you, it made for a very fun making experience! I felt like a child, making without knowing about 'shoulds' or techniques. I know it can be fun to perfect techniques and skill, but for a quilt of firsts, I just wanted to play. And because we were keeping this one for us, I felt like I could make mistakes and learn from them, rather than try to avoid them.
So on went my Learning Hat and out came the free motion quilting foot! 


Here's what I learned:
  • Free motion quilting is FUN and very forgiving! I made lines upon lines of little daisies, going back and forth (which I thought would be easier this time round than a random track). It took me about three or four lines to get flowers I was really happy with. But interestingly, this had more to do with foot control and having a heavy quilt get caught on the sides of the table, than making the actual flowers themselves. When all those factors were easy, the 'drawing' itself came quite naturally. 

  • It was much easier to pull the quilt towards me, than push it away (I'm guessing because the weight was on the table, rather than on my lap) so every second line of daisies is MUCH neater! I didn't buy any extras for this quilting experience, because I wanted to see what my style was like first. I think I'll be getting some grippy gloves because I was much more comfortable with flat hands than holding the quilt. And I'd be interested to see if one of those stickers that cover the feed dogs makes a difference too.

  • I LOVE my throat space and auto-thread tension! And I used Leah Day's recommendations for set up rather than my manual (feed dogs up, stitch length on zero) and that worked well too.
  • It's much more important to let Evie have a turn (sock hands and all!) than get it done right or quickly, at least for her own quilt. :) She never once seemed interested in the colours or design of this quilt (not enough tutus or pink!) but did want to help me baste it (so I used pins instead of spray), and quilt it. Trying to make flowers while she leant on the quilt was pretty hilarious, and at times, frustrating, but I'm hoping, over time, it will lead naturally to her making things herself (and feeling like she can just play also!). 


  • I am not a 'measure twice, cut once' type of gal. More like a measure nonce, cut 3 or 4 times. And look how it paid off with my binding. Score! I'm learning to embrace the way I work creatively, and be ok when I have to cut extra, or have made too much, rather than chastise myself for jumping in. Because I do measure when precision important to me. But when motivation is dependant on starting now, I enjoy starting at the machine early. And that's ok.

  • Machine binding is FAST but mine needs a little practice. And more precision is needed in first sewing the binding on, rather than the final finish, to ultimately make it neater. I think next time I'll try Rachel's zig-zag binding finish. I've thought in the past that it wouldn't fit my hand-quilting style, but I think it would totally suit the crinkly nature of free motion quilting. 
  • I was a little worried about all the fabric needed for the back, until my friend gave me a whole lot of second hand girls' double bed sheet sets! And the one I used for the back just happened to have the lovely 'orange peel' or cathedral print on it. A perfect match, I thought, for a quilt with a Stitchy theme. And I have matching pillow cases! It was just the kind of provision I was hoping for when I embarked on my fabric fast.

  • And finally, even though toys and outings seem more desireable to my kids, I'm always amazed at how much something handmade means to them. Evie played with, and in, this quilt for over an hour after I finished it! And it's since been used for forts, hide and seek, and extra long and dangerous super hero capes! Oh, and for now, bed time is very easy!

(and how cute is this pillow Tim's mum bought to match!)