Monday 25 May 2015

Rosebud - Red Sky at Night Quilt


The Rose! It's such a long time, significant cultural symbol. We can quote references from Shakespeare and the Bible, we've associated it with passion and romance since the Ancient Greeks, we've used it to represent states and nations, revolution and peace, football and space programs. So it's little wonder it became a popular motif for applique and patchwork as early as the 1800s. In Barbara Brackman's Encyclopedia of Pieced Quilt Patterns, there are nearly 30 blocks with the name Rose in it, and that doesn't include applique!

This block was first published in the Ladies Art Company Catalogue #17 in the 1920s, the only edition of which I couldn't find a copy online! But I did find this collection of the quilt pattern catalogues up to #16. It's so fun to see them set out like they were. Just send 10c in an envelope to the address, and receive the full pattern. I wonder how many just figured it out themselves from the catalogue? That's what I would have done!

Today on my Google adventure, I clicked on a link to a brief bio of Rose Kennedy, mother to the Kennedy boys, and social and political extraordinaire. She lived to 104 (!) through an incredible century of wars, depression, wealth, and change. And at her funeral, her son Ted said this,

"She sustained us in the saddest times—by her faith in God, which was the greatest gift she gave us—and by the strength of her character, which was a combination of the sweetest gentleness and the most tempered steel."

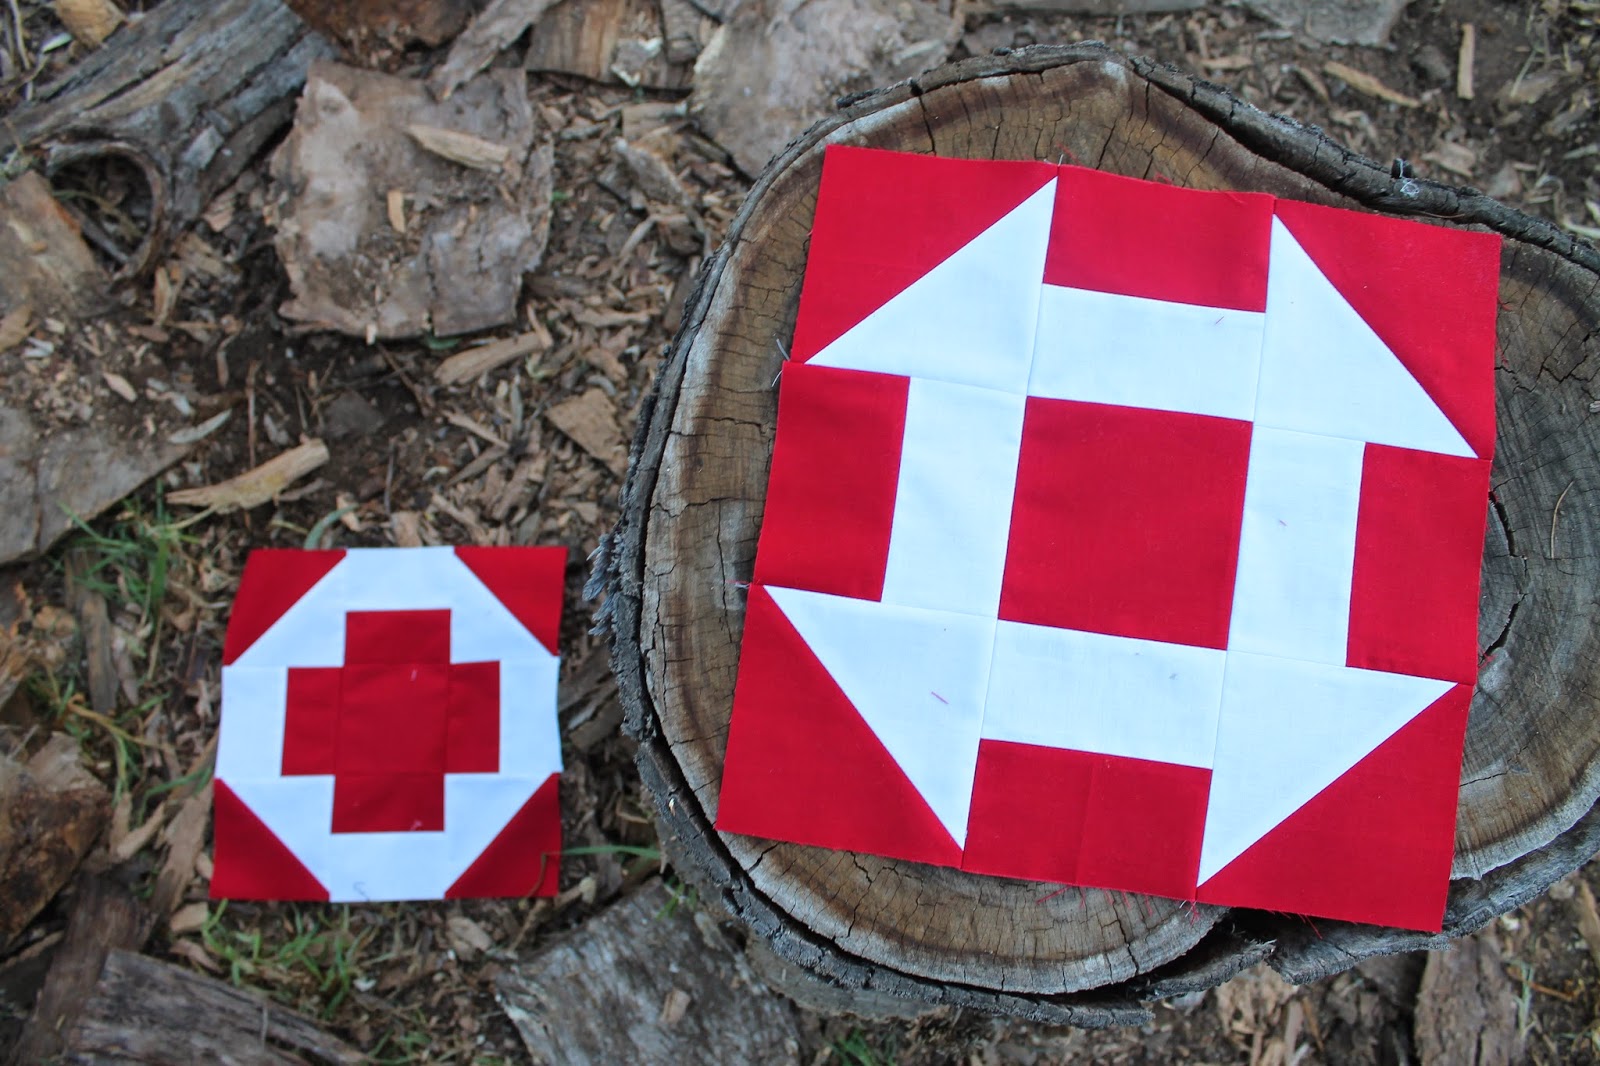
Gentleness and strength, passion and peace, they are the things I'll be reminded of this week when I look at my Rosebud in it's place on the design wall.

I had a real win with quilt maths this week! I'm understanding more, as I make these blocks, what's required for seam allowances, and how to break a block down. I spent so much time enjoying this block coming together (look at me! I can do triangles in triangles!), that I fell completely short taking photos. Sorry! You can't hit all the goals at once, apparently.

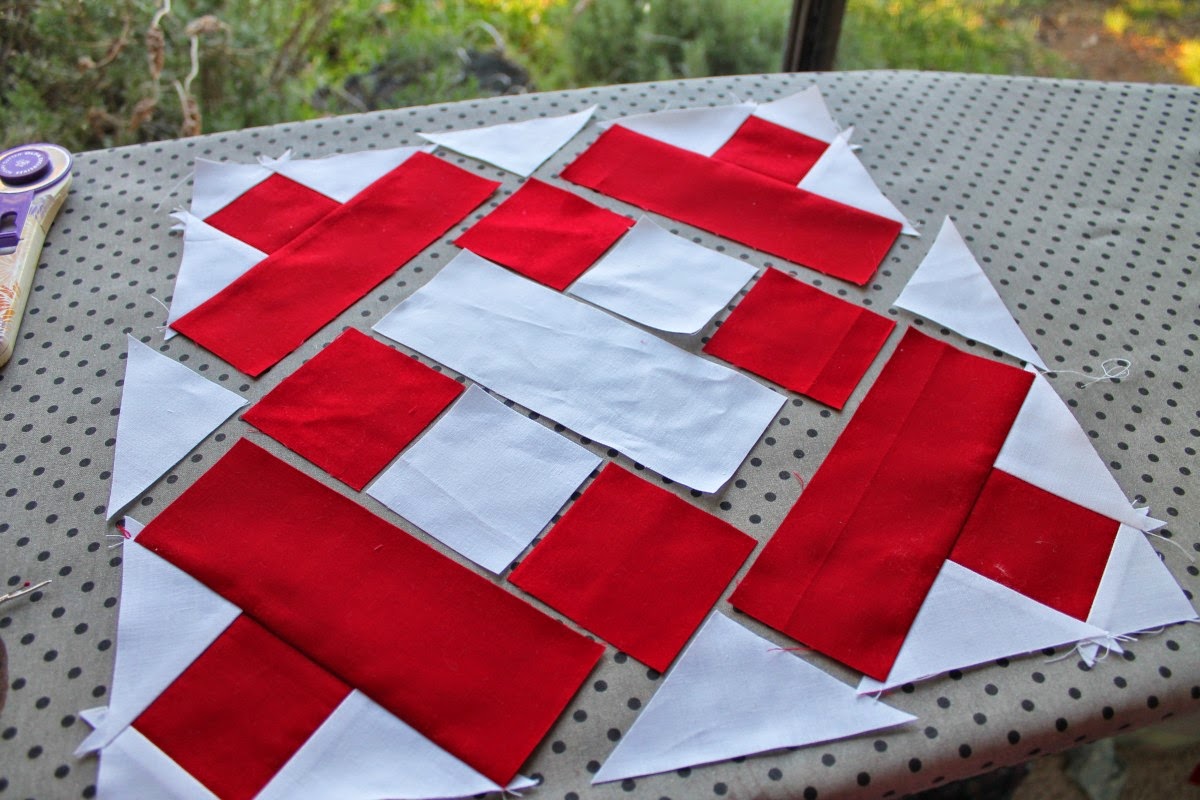
ROSEBUD 12" BLOCK TUTORIAL

You will need:

Red: Two 7" squares cut in half diagonally, two 3" squares cut in half diagonally, two 4.5" squares.

White: Two 5" squares cut in half diagonally, two 4.5" squares.


1. Sew each of the red 4.5" squares to each of the white 4.5" squares, around each edge.

2. Cut in half diagonally, and in half again. Press seams open or towards the red and trim to 2.5".


3. Lay out your pieces as below. It will help you keep in mind which side of which triangle to sew. A simple rule is that the long sides of each triangle face the middle of each bud.


4. Sew your trimmed 2.5" HST next to each other for each bud.

5. Sew the white triangle to this piece, first lining up the straight edges together as below. In the picture below, you'll sew your seam across the top.


6. Next, attach your small red triangle to complete that bud. Start by lining up the straight edges together, then stitching along the top.

 
7. Sew this triangle made of triangles (woohoo!) to the red half square triangle to make a 6.5" square. Check its size. Trim to 6.5" if you need to.

8. Lay your squares back out again as above. Sew them together by two, then those two together to complete your block.


It's a sweet flower, don't you think? Doing this series is giving me such an appreciation for these everyday things represented in squares and triangles. The modern version on foundation paper piecing is admirable, and often amazing, but the simplicity of these blocks are so striking and timeless, don't you agree?

Wednesday 20 May 2015

Star Crossed Sew Along


The first thing that crossed my mind, when I was sent this Star Crossed pattern to try, was how fun it would look in scraps, little scraps. I'd had in mind for a while that I wanted to make a quilt featuring Maureen Cracknell's Luminous Field Print, a delicious low volume floral, made of beautiful warm colours. And I knew this would be just perfect! I pulled a bunch of matching prints from my stash and started to cut.  In usual fashion, I immediately altered the pattern, and got so excited about the design that I ran straight for the single (twin) bed option.


Unfortunately 20 blocks worth of star points quickly ate up my stash of Luminous Field. It was then that this Catnap print by Lizzy House made its debut. As much as I would have loved Maureen's floral art to be a feature in this quilt, those cats, fitting perfectly in a 4.5" square, a perfect colour match, and pretty challenging to use anywhere else, became a very fun change of direction. I'm pretty excited with the result. It's everything I love about scrappy postage stamp quilts but sparkly! I love that the eye has somewhere to rest and move. It's like fireworks, don't you think?


This turned out to be the quilt that broke the camel's back, mechanically speaking. My machine, long in desperate need for a service, starting groaning and breaking needles. I managed to coax it along gently for this finish. And my iron died a messy, spluttering death on the home stretch! It felt like the perfect opportunity to try out Jeannette from Gone Aussie Quilting's quilting service. I can't wait to see the result! What kind of edge to edge design would you try out on these sparkles?


So, after pushing myself to get some hard-won finishes the last month, being without my machine for a few weeks actually feels like an exciting creative challenge! I'm thinking hexies. I'm thinking appliqué. I'm even thinking Broderie Perse. Ooh!

Thanks so much Fat Quarter Shop for inviting me to make this pattern! Check out these other blogs and #starcrossedsewalong in Instagram for other interpretations of the design.

Daisy of Ants to Sugar
Lucy of Charm About You
Julie of the Crafty Quilter
Angie of Gnome Angel
Dana of Old Red Barn Co.
Natalia of Piece N Quilt
Heather and Megan of Quilt Story
Amy of Sew Incredible Crazy


Monday 18 May 2015

Churn Dash & Greek Cross - Red Sky at Night


All the quilts I've been making lately have been gifts. Gifts are fun to make, but they also bring with them a different underlying design guide. Rather than going by feel, by that adventurous and daring 'I wonder if this would work?' or 'this doesn't look how I imagined, let's change tack,' I'm directed by what I think my recipient would like. When I'm making just for making, I feel free to try, to play, to fail. I lose that freedom when I make for others. I spend a lot of time second guessing. Last week, I lay all my red and white blocks out on my design wall and had a little freak out. It was so....red and white! Two colours! No clash! A sampler rather than repetitive and geometric.
ARGH! What could I do to make this more me, more mine? A red and white sampler could belong to anyone, right? How can I make my mark? Include my stamp? And so it went on through that day and into the evening. That night I couldn't sleep so I made myself a cup of tea and sat by the fire with my grid book. Suddenly ideas started popping into my head. What about a single colourful block? Or little aqua stars in the sashing? A pop of red floral? Or I could introduce some coral and navy! Yes! I started to get excited again and gathered up a collection of ideas to show my mum when she visited yesterday.


I realised, while chatting to my mum about her quilt, that I don't often get to check in with the friends I'm making quilts for, while I'm making them. I sat her down in front of my design wall, and ran through all the options. She loved, loved, loved the red and white, on its own, just as it was.
"It's just so me!" She exclaimed, satisfied. And I could see that she was getting the same feeling about  red and white, that I get about clash and saturation. It made me so glad I checked. And it was just the encouragement I needed to keep going, free of that niggling doubt.
Today I enjoyed that freedom so much, I made TWO blocks! And because they are made up of all the same ingredients, and came together so quickly, I've thrown them together in the same tutorial. I knew you wouldn't mind!
The Churn Dash is old, reportedly from the early 1800s, but its earliest print publications date back only to the late 1920s-early 30s, along with most of our other blocks. It's named, as many of you would know, for the old butter churn, and was one of the most common blocks for little girls to make. I'm guessing that's because it's so simple, yet striking, and easy to alter or play with. According to Barbara Brackman's Encyclopaedia of Pieced Quilt Patterns, this block, and it's alternative layouts, have TWENTY FIVE different names, all from the same period, including Shoo Fly, Monkey Wrench and Lincoln's Platform. It's one of those blocks that's so common in the quilting world, that's it's easy to find its basic history, but as usual, I'm left with more questions. Why the sudden explosion of the block in the 1930s? Why all the names? Did they look at the butter churn and think, 'That would make a great block!' or did they make the block and it reminded them of the butter churn? WHY Shoo Fly? Did Laura Ingalls Wilder make this quilt??
I really hope Heaven is the kind of place where I can seek out these women and ask them. I could happily spend an eternity talking patchwork stories!

I included the Greek Cross in this tutorial because all you have to do is flip the squares made of rectangles. And BAZZING! A completely new design! And you probably know by now how much I love magic tricks. This is definitely another one for my "make a whole quilt from" list.

CHURN DASH/GREEK CROSS 12" BLOCK TUTORIAL:
For this tutorial, I've given the fabric requirements for one block. Double it to make these two blocks at once.

You will need:

Red: Two 5" squares cut in half diagonally to make half square triangles, four 2.5" x 4.5" rectangles, one 4.5" square.

White: Two 5" squares cut in half diagonally to make half square triangles, four 2.5" x 4.5" rectangles.


1. Sew the red rectangles to the white rectangles. Press seams open or towards the red.


2. Sew the red triangles to the white triangles. Press seams. Trim to 4.5" square.


3. For the CHURN DASH, lay out with red square in centre, and white bars touching it. Sew together in three rows. Press and sew those rows together.


4. For the GREEK CROSS, simply flip the rectangles so that the red bars touch the red square. BAZZING!


Wasn't that satisfying?! I'm really enjoying that settled feeling once more of knowing what I'm making. It's not quite as thrilling as playing with clashy, bright colours, but it sure beats constantly second guessing myself. And I do love peaceful piecing!

Monday 11 May 2015

Spider Legs - Red Sky at Night Quilt


Because I sew instead of do housework, I've developed quite a a symbiotic relationship with the spiders in my house. They are mostly daddy long legs, and they are really very good at catching the billion flies that love to visit my home because I have children that leave doors open, and I live next to a sheep paddock. Every so often, when I feel grosed out by bug debris, I'll vacuum them up, but they come straight back. And I don't mind.
There's a particularly beautiful spider, that until last week, (when someone who shall remain nameless, kindly cleaned my front verandah for me) was living just outside my sewing room window. I think it was a St Andrew's Cross, but we just called her Charlotte. And she reminded me exactly of this block. And she encouraged me to keep making.

I was reading Charlotte's Web to the kids earlier in the year, when I was planning this quilt along. It has become one of my favourite children's books, and the more meaningful to me, the older I get. I've written here before that in my twenties, I really did expect to change the world. When I became a mum, it felt like one long experience of failure. The washing basket was never empty (still isn't), grocery shopping happened when we'd been living on beans and eggs for three days, and I certainly never made it to the cobwebs. But Charlotte made me feel like if I just used my creativity and intelligence and wit and was open to the little opportunities around me, I could make a big difference, even in one little life. And that even the little life of a pig was a meaningful investment. She reminded me that making quilts and tea and memories could be the most wonderful way to spend a life.

This block is an altered version of one found in The Farmer's Wife. I couldn't find it in Brackman's Quilt Block Encyclopedia, nor anywhere else online, apart from in Farmer's Wife quilts. But I wanted to keep it anyway as a special one for me.

Did you enjoy your break from half square triangles last week? I hope so, because these ones are teeny!

SPIDER LEGS 12.5" BLOCK TUTORIAL

You will need:

Red: Four 4.5" squares, eight 2.5" squares, eight 1.5" squares, twelve 2" squares cut in half to make make half square triangles. (Do you hate me yet?!)

White: One 2.5" square, eight 1.5" squares, twelve 2" squares cut in half diagonally to make half square triangles.


1. Sew the red triangles to the white triangles. Press seams open. Trim to 1.5".

2. We're going to start the block by making the centre star. Lay out as below, with the 2.5" white square in the centre. And small red squares in the corners.


3. Sew the star points together. Press open.


4. Add the side points to the star's centre. Press the seams towards the centre.


5. Sew the red corners to each side of the top and bottom star points. Sew the three rows together to make your star.


6. Next we're going to make the eight 'legs'. Arrange the arrows as below, with the white triangles pointing together and a white and red square on opposite corners.

7. Sew the top two pieces together, then the bottom two. Press towards the square. Then sew these two pieces together.


8. Make the other seven identical!


9. Arrange the little arrows/legs in a square as below, with 2.5" squares in the corners. Sew them together.


10. Repeat for each corner of the block. Then lay out like this:


11. Sew together in rows. Press towards the whole squares. Sew the three rows together to complete your block!


I loved making this one, but I did cut it out and sew those baby triangles together a few weeks ago. So maybe if you break the steps up, it won't seem so daunting.

This morning I put most of mine up on my design wall, and decided I really liked them on point. What about you? If we sew them together on point, we need only 41 blocks to make a queen size bed, rather than 49. I'm still going to make the 49, with tutorials and stories, and then I'll see what I like best. If I go with this layout, I'll use the extras for the back. I just thought I'd let you know now, in case you want to pick and choose what you make for the front. It might make the QAL feel more manageable to take a week off now and then!
FYI: 50 blocks, on point, make a king size quilt, in case you want to go really big!


E.B White finishes Charlotte's Web with this:

It is not often that someone comes along that is a true friend and a good writer. Charlotte was both. 

Ah, that makes me smile every time!

Monday 4 May 2015

Album - Red Sky at Night Quilt


I've just spent the most lovely weekend sewing the final Flowers quilt with a friend of mine. It's such a treat sewing in company isn't it? I was pretty spoilt for quilty friends in Newcastle, but since moving to a small country town, I've yet to meet anyone who sews. It makes me so thankful for blogs and Instagram!
I once read in the book Quiet, by Susan Cain, that until the 1920s, most of us lived our whole lives in one rural town, got jobs through local and family connections, married our cousin, or that boy we went to school with, and grew our children up to be softly spoken, respectable citizens. What happened after 1920s? We came home from war, spent about a decade enjoying a season of peace and prosperity, and then walked headlong into the depression. The depression turned stable, connected folk into isolated nomads. The desperate competition for work changed people's view of 'trustworthy' from someone who minded their own business, to someone willing to put themselves out there.


I find it fascinating that the context of the depression gave rise to the explosion of quilt block patterns in newspaper columns, mail order catalogues and book publications. Were women even more motivated to find beautiful ways to reuse old clothing or linens? Did the isolation of moving to new towns or having their husbands away looking for work, draw them to the connections found in craft, whether in local groups or newspapers? So far I haven't found definitive answers, but it does intrigue me.

You can find a drawn copy similar to this pattern over at The Quilt Index. The pattern credits Nancy Cabot, a quilting columnist for the Chicago Tribune in the 1930s as the designer, though it was used published by other authors also. The block was used traditionally as a kind of signature block. A group of women, or quilting bee, might make a quilt together to gift a new bride or for a farewell, and each sign the white cross in the centre. The copy is an example of patterns drawn for swaps and pen pals in the 1960s. Women would advertise in magazines that they were organising, or interested in participating in pattern swaps, and build long lasting penpal friendships.


'Album' is a nice change from our other blocks so far - no half square triangles to trim! Mine finished off slightly under 12.5" though, so keep your 1/4" seams scant. I found this pattern by Barbara Brackman and adjusted it slightly. Watch out for all those funny fractions!

You will need:

Red: Eight 2 5/8" squares, four 2 5/8" x 6 7/8" rectangles

White: Six 3" squares cut in half diagonally, two 2 3/8" squares cut in half diagonally (for the corners), two 2 5/8" squares, one 2 5/8" x 6 7/8" rectangle.

1. Lay out your block as above with the white cross in the middle, red squares cornering the white cross. Next, lay down the red rectangles, the extra red squares in the corners, and the larger white triangles around the outside. place the smallest white triangles in the corners.


2. Sew each of the tiny white triangles to the side of each corner square.


3. Sew the two triangles next to the corner squares to each side of the red squares.


4. Line up these new pieced triangles with the red rectangle next to them, the edges of the triangle hanging equally over the edges of the rectangle. Sew them together. Press the seam towards the rectangle.


5. Now to the centre! Sew the red squares to two sides of the white squares. Press.


6. Sew the three lines in the centre together to make the white cross.


7. Sew a corner piece to two sides of the white cross to make a solid piece through the middle.


8. Sew the last white triangles to each side of the remaining T's.


9. Then sew your last three pieces together. Trim to 12.5"


Sewing Flowers for Eleni this weekend, made me so thankful for quilty friends. Both the one in my sewing room while we madly chatted about all the ideas we have and things we love, and for my online 'penpals'. It makes me feel even more connected to know that quilting has been drawing people together in similar friendships for hundreds of years. We belong to such a rich community.